Showing posts with label virtualbox. Show all posts

How to upgrade virtualbox 2.8 to 3.0 in ubuntu

It is time to upgrade virtualbox. Normally it is a simple task with simple steps but we have to do them in this order.

In the command line:

Adding the debian repository key to our machine:

user@machine:~$ wget -q http://download.virtualbox.org/virtualbox/debian/sun_vbox.asc -O- | sudo apt-key add -

And installing

user@machine:~$ sudo apt-get install virtualbox-3.0

The Sun VirtualBox item in the Applications, System Tools menu will appear in the next bootup.

Alternatively, you can use the Synaptic Package Manager in the System, Administration menu.

By the way, DJ Soul Rebel asked me to post an entry on how to install BT4 directly in a netbook with no virtual machine involved. I will look into that (as you see, there is no deadline committed ;-)

Creating & moving a virtual machine

We frequently use virtual machines from where we launch our security tools.

Virtual machine creation
Sometimes we need to create a virtual machine from scratch. Here we provide some initial tips about it:

In our last posting we talked about a simple way to make a physical machine virtual. This time we continue on the virtual world. We use VirtualBox as the platform where we create a virtual machine.

First hint: We recommend to use Sun VirtualBox rather than the Open Source Edition (provided that the license terms fit our needs). Using USB drives is easier in the software from Sun.

We find the instructions to build Sun VirtualBox here. The actual installation of a host operating system is easy following the wizard appearing when we run the Menu item Applications > System Tools > Sun xVM VirtualBox if e.g. we the host OS is Ubuntu.

Second hint: Create a hard disk with the possibility to grow in size i.e. VirtualBox call it a dynamically expandable storage.

Moving a virtual machine
On the source machine...
We copy to a removable media the .vdi file (normally residing on /home/.VirtualBox/HardDisks) - This can be a big file.

Third hint: If we do not see the hidden directories in the Ubuntu file browser, press CTRL + H.

On the destination machine...
We paste the .vdi file on the HardDisks folder in our VirtualBox installation and we start the New Virtual Machine wizard (just pressing New when running Sun xVM VirtualBox) and when we are asked about the hard disk to use, we simply point to the .vdi file we have just moved.

Fourth hint: Installing Guest Additions (use this link to download the software, it is not easy to find it) in the guest OS provide us with more video, audio and storage device recognitions capabilities. However...

Fifth hint: If we move virtual machines from one machine to another, we recommend to uninstall in source and re-install in destination. Guest additions is closely link to the architecture of the host system.

Happy security tool testing in your new virtual environment!

Backtrack, netbooks and virtualisation


The need to install and work with new Linux distributions, some of them security related such us Backtrack 3, is always permanent. By the way, here you can find the link to the Linux distributions list.

Most of the current security tools run on those platforms. If we add as hardware element to this scenario one of the lightweight and attractive netbooks, then the combination can result into a frustrating experience trying to get network, especially wireless, video and sound to work.

This entry proposes a way forward for the scenario mentioned. The target will be to install a security testing platform (e.g. Backtrack 3) in a netbook without having to install new drivers on the machine (see screenshot above). The key steps are:

- Install in your netbook the operating system you prefer. If possible, let it coincide with the easiest OS. For example, the installation of Ubuntu intrepid (8.10) in most of the netbooks is relatively easy following the tips presented in the Ubuntu wiki. Do not trust all sites proposing ways forward to solve the problems you face with the installation (some of the pages that the typical search engines can provide with keywords such as "install wireless Ubuntu netbook name" will confuse you rather than help you).

- Once you get your video drivers and network to work, you have already a working platform - let's get the most of that. Probably you will need to install additional drivers in Ubuntu. A note on this, keep the driver files (and the instructions how to do it) at hand. You will need to install them again after a kernel update if they are not part of the regular distribution.

- Install virtualbox, a virtualisation platform available from Sun, ready to use and able to produce snapshots.

- Within virtualbox, create a virtual machine out of the Backtrack 3 iso file. You can even create a bootable virtual harddisk based on BT3 following this website (the last fragment related to VMware, where there is also a link to the automated script present in BT3 beta, and absent in BT3 final, that will help you) and this one (also at the end of the page).

- There is no need to go through the hassle of installing new drivers. If you got your wireless network running in your host system, then the guest system will use it directly ;-)

This way, you will get something like the screenshot below i.e. Backtrack 3 with a working wireless connection running on a virtual machine on top of Ubuntu Intrepid.

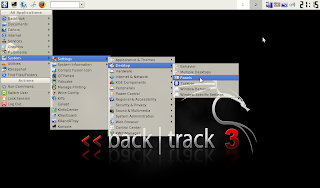
Last handy tip: Follow the menues shown in this screenshot and place the KDE panel on top of the screen and not below (as it appears by default)- otherwise you will not see it in the small screen of the netbook - unless you install virtuabox guest additions!)
Happy virtual work!