
There is a myriad of IT security related videos available on Internet.
This post deals with how to download flv videos and how to extract their audio so that they can be listened while commuting.
Downloading the video file
First step: Install the flashgot add-on in a Firefox browser.
Second step: Download the video file (flv format). The flashgot site explains the installation of the add-on and its use (basically, left and right click on the flashgot icon in the browser status bar will do).
Third step: Once the flv file is stored locally...
Extracting the audio from the video file
Here are some tips to extract the audio track from the flv file into a mp3 file so that it is ready to be listened to:
user@machine:~$ ffmpeg -i Videofileyouhave.flv -vn -ab 64000 Audiofile.mp3
Maybe parameters in the command line need to be modified according to the parameters of the video file. This line is useful to find out those video file parameters:
user@machine:~$ ffmpeg -i file
After this, depending on the mp3 player that will play the audio, sometimes it is necessary to edit the labels in the mp3 file. In Linux, easytag can do it.
When the mp3 file is not reproducible by a specific mp3 player, the use of the package audacity is required. First, to import the initial mp3 file, second, to label it, and, finally, to be export the audio to a new mp3 file.
The final mp3 file will probably be audible in the player at hand.
Happy listening!
p.s. Special thanks to M.A. for the flashgot tip.
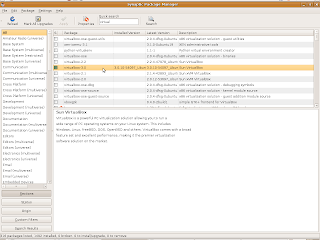
How to upgrade virtualbox 2.8 to 3.0 in ubuntu
Labels:
update manager,
upgrade,
virtualbox
It is time to upgrade virtualbox. Normally it is a simple task with simple steps but we have to do them in this order.
In the command line:
Adding the debian repository key to our machine:
user@machine:~$ wget -q http://download.virtualbox.org/virtualbox/debian/sun_vbox.asc -O- | sudo apt-key add -
And installing
user@machine:~$ sudo apt-get install virtualbox-3.0
The Sun VirtualBox item in the Applications, System Tools menu will appear in the next bootup.
Alternatively, you can use the Synaptic Package Manager in the System, Administration menu.
By the way, DJ Soul Rebel asked me to post an entry on how to install BT4 directly in a netbook with no virtual machine involved. I will look into that (as you see, there is no deadline committed ;-)

First security steps after installing an Ubuntu Intrepid machine
Labels:
antivirus,
clamav,
firestarter,
firewall
Two cents to start securing your Linux Ubuntu Intrepid box: A firewall and an antivirus.
- Install a personal firewall e.g. firestarter
- $sudo apt-get install firestarter will install it (more here)
- More on how to use it here
- I recommend to run it at bootup time for all users (including the non-admin ones). Go to system>preferences>sessions and add /usr/sbin/firestarter
- For the non-admin ones, you need to edit the sudoers file as indicated here
- Use the System > Preferences > Session to include the command sudo firestarter
- Install an antivirus such as clamav
- $sudo apt-get install clamav-daemon
- More on how to do it (checking that it runs, scheduling an update, etc) here
Those are the first steps to keep the machine secure!
- Install a personal firewall e.g. firestarter
- $sudo apt-get install firestarter will install it (more here)
- More on how to use it here
- I recommend to run it at bootup time for all users (including the non-admin ones). Go to system>preferences>sessions and add /usr/sbin/firestarter
- For the non-admin ones, you need to edit the sudoers file as indicated here
- Use the System > Preferences > Session to include the command sudo firestarter
- Install an antivirus such as clamav
- $sudo apt-get install clamav-daemon
- More on how to do it (checking that it runs, scheduling an update, etc) here

Those are the first steps to keep the machine secure!
Creating & moving a virtual machine
Labels:
creating,
Guest Additions,
moving,
vdi file,
virtualbox
We frequently use virtual machines from where we launch our security tools.
Virtual machine creation
Sometimes we need to create a virtual machine from scratch. Here we provide some initial tips about it:
In our last posting we talked about a simple way to make a physical machine virtual. This time we continue on the virtual world. We use VirtualBox as the platform where we create a virtual machine.
First hint: We recommend to use Sun VirtualBox rather than the Open Source Edition (provided that the license terms fit our needs). Using USB drives is easier in the software from Sun.
We find the instructions to build Sun VirtualBox here. The actual installation of a host operating system is easy following the wizard appearing when we run the Menu item Applications > System Tools > Sun xVM VirtualBox if e.g. we the host OS is Ubuntu.
Second hint: Create a hard disk with the possibility to grow in size i.e. VirtualBox call it a dynamically expandable storage.
Moving a virtual machine
On the source machine...
We copy to a removable media the .vdi file (normally residing on /home/.VirtualBox/HardDisks) - This can be a big file.
Third hint: If we do not see the hidden directories in the Ubuntu file browser, press CTRL + H.
On the destination machine...
We paste the .vdi file on the HardDisks folder in our VirtualBox installation and we start the New Virtual Machine wizard (just pressing New when running Sun xVM VirtualBox) and when we are asked about the hard disk to use, we simply point to the .vdi file we have just moved.
Fourth hint: Installing Guest Additions (use this link to download the software, it is not easy to find it) in the guest OS provide us with more video, audio and storage device recognitions capabilities. However...
Fifth hint: If we move virtual machines from one machine to another, we recommend to uninstall in source and re-install in destination. Guest additions is closely link to the architecture of the host system.
Happy security tool testing in your new virtual environment!
From a physical to a virtual machine
Sometimes it is smarter to install new security tools in a virtual machine rather than in our everyday's physical machine. Playing with virtual machines could facilitate the process of reverting back to the previous state.
VMware offers the possibility to download VMware converter. This tools helps you virtualising a physical machine. Just create an account in VMware site and you can download this tool, both in Linux and MS Windows flavours, through a link you receive in your inbox.
The process is simple, just install the converter in the physical machine you would like to virtualise and follow its wizard. Count on several hours to perform the process, depending on the size of the physical machine.
Once the conversion is done, you can simply use VMware player to access your new virtual machine. Before installing the newest and coolest security tool you want to test, copy the virtual machine directory to guarantee a backout possibility.

Welcome to the virtual world!
Security sites to recommend - articles for Spanish-speakers
Labels:
articles,
security sites,
SIC,
Spanish
For those able to read Spanish, there are already 8 articles in a popular security magazine recommending and introducing top-notch security sites. You can find them here:
1- pauldotcom.com
2- sans.org
3- commandlinekungfu.com
4- gnucitizen.org
5- irongeek.com
6- taosecurity.blogspot.com
7- www.socialengineer.org
8- jarlsberg.appspot.com
9- www.ethicalhacker.net
10- www.darkreading.com
11- ha.ckers.org
12- shadowserver.org
13- www.securitywizardry.com
14- infosecisland.com
Happy reading!
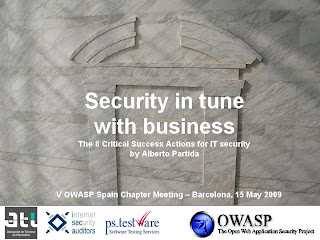
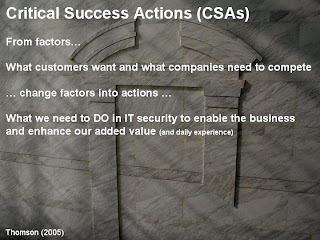
Presentation at the V OWASP Spain Chapter meeting
This is an extract of the presentation given last 15 May 2009 at an OWASP Chapter Meeting. Thanks to the audience for their presence!
The presentation can also be downloaded from the OWASP site
Slide 1
Slide 2

Slide 3

Slide 4
Slide 5
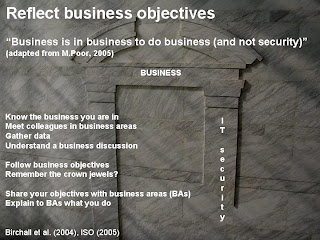
Slide 6
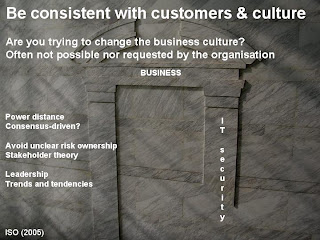
Slide 7
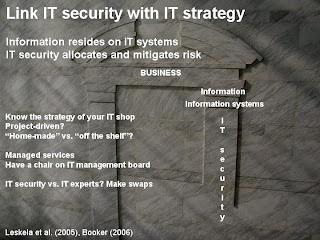
Slide 8
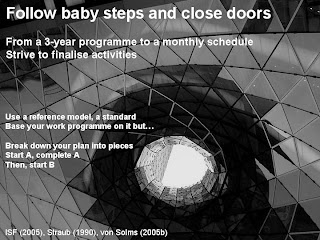
Slide 9
Slide 10
Slide 11
Slide 12

Slide 13

Slide 14

Slide 15
Slide 16
How to contact the author? Send an email to resolvemos at gmail.com
The presentation can also be downloaded from the OWASP site
Slide 1

Slide 2

Slide 3

Slide 4

Slide 5

Slide 6

Slide 7

Slide 8

Slide 9

Slide 10

Slide 11

Slide 12

Slide 13

Slide 14

Slide 15

Slide 16

How to contact the author? Send an email to resolvemos at gmail.com
Forensics - Mac times 101
One of the foundations in forensics is the collection of mac times. Mac times are part of file system metadata. They refer to the modified,access,changed (or created) time triplet every file has in file systems such as FAT, NTFS and ext3. An intro on mac times can be found here.
How do they work? Let's see an example in an ext3 linux-based file system. Similar learnings can be applied on other file systems.
Before starting, we install the mactime command-line application. It is part of The Coroner's Toolkit (forensic utilities).
user@machine:/tmp$ sudo apt-get install tct
We check that the mactime functionality is installed by simply invoking man:
user@machine:~$ man mactime
We start by creating a directory called mactests in /tmp where we will do our tests:
user@machine:/tmp$ mkdir mactests
user@machine:/tmp$ cd mactests
mactime test 1 - creating a file with touch
We touch a file in this testing directory and we run mactime (-y to have the year first in every line, -d to tell the directory and we need to add a date after 1/1/1970). For aesthetic purposes we add grep -v to get rid of two tmp file lines created by the mactime utility itself.
user@machine:/tmp/mactests$ touch file01
user@machine:/tmp/mactests$ mactime -y -d /tmp/mactests/ 1/2/1970 | grep -v mactime
09 Apr 10 13:37:39 0 mac -rw-r--r-- user user /tmp/mactests/file01
-> Result 1: Creating a file modifies all three times (that is why the three letters, mac, appear on the result line).
mactime test 2 - modifying a file by adding text
user@machine:/tmp/mactests$ cat /etc/resolv.conf > file01
user@machine:/tmp/mactests$ mactime -y -d /tmp/mactests/ 1/2/1970 | grep -v mactime
09 Apr 10 13:37:39 45 .a. -rw-r--r-- user user /tmp/mactests/file01
09 Apr 10 14:00:46 45 m.c -rw-r--r-- user user /tmp/mactests/file01
-> Result 2: Adding text to a file modifies two times, m and c.
mactime test 3 - changing file rights
user@machine:/tmp/mactests$ chmod u+x file01
user@machine:/tmp/mactests$ mactime -y -d /tmp/mactests/ 1/2/1970 | grep -v mactime
09 Apr 10 13:37:39 45 .a. -rwxr--r-- user user /tmp/mactests/file01
09 Apr 10 14:00:46 45 m.. -rwxr--r-- user user /tmp/mactests/file01
09 Apr 10 14:04:13 45 ..c -rwxr--r-- user user /tmp/mactests/file01
-> Result 3: Changing file rights modifies c time only.
mactime test 4 - editing a file
user@machine:/tmp/mactests$ vi file01
user@machine:/tmp/mactests$ mactime -y -d /tmp/mactests/ 1/2/1970 | grep -v mactime
09 Apr 10 16:04:44 105 .a. -rwxr--r-- user user /tmp/mactests/file01
09 Apr 10 16:05:16 105 m.c -rwxr--r-- user user /tmp/mactests/file01
-> Result 4: Editing a file modifies two times, m and c - This is similar to test 1. We just write this here to show how mac times ONLY keep the latest time (see e.g. how creation time is lost from the mac times the first time the file is edited).
mactime test 5 - what happens when a file is copied?
user@machine:/tmp/mactests$ cp file01 file02
user@machine:/tmp/mactests$ mactime -y -d /tmp/mactests/ 1/2/1970 | grep -v mactime
09 Apr 10 16:05:16 105 m.c -rwxr--r-- user user /tmp/mactests/file01
09 Apr 10 16:10:18 105 .a. -rwxr--r-- user user /tmp/mactests/file01
105 mac -rwxr--r-- user user /tmp/mactests/file02
-> Result 5: Copying a file means that source file changes its access time and destination file modifies all its three mac times.
mactime test 6 - compressing files
user@machine:/tmp/mactests$ touch file03
user@machine:/tmp/mactests$ tar -cvf file.tar *
file01
file02
file03
user@machine:/tmp/mactests$ mactime -y -d /tmp/mactests/ 1/2/1970 | grep -v mactime
09 Apr 10 16:19:55 0 mac -rw-r--r-- user user /tmp/mactests/file03
09 Apr 10 17:52:57 4130 m.c -rwxr--r-- user user /tmp/mactests/file01
09 Apr 10 17:53:07 2598 m.c -rwxr--r-- user user /tmp/mactests/file02
09 Apr 10 17:53:17 10240 mac -rw-r--r-- user user /tmp/mactests/file.tar
4130 .a. -rwxr--r-- user user /tmp/mactests/file01
2598 .a. -rwxr--r-- user user /tmp/mactests/file02
-> Result 6: Compressing files, all three mac times of the .tar compressed file are modified (exactly as when creating a new file). Accessed files modify their access time only if their modification time has been changed after they were last accessed (this has to do to the way working memory is handled - this is the reason why file01 and file02 access times appear modified and it is not the case for the just created file03).
mactime test 7 - uncompressing files
user@machine:/tmp/mactests$ mkdir untar
user@machine:/tmp/mactests$ cd untar/
user@machine:/tmp/mactests/untar$ tar -xvf ../file.tar
file01
file02
file03
user@machine:/tmp/mactests/untar$ mactime -y -d /tmp/mactests/untar/ 1/2/1970 | grep -v mactime
09 Apr 10 16:19:55 0 m.. -rw-r--r-- user user /tmp/mactests/untar/file03
09 Apr 10 17:52:57 4130 m.. -rwxr--r-- user user /tmp/mactests/untar/file01
09 Apr 10 17:53:07 2598 m.. -rwxr--r-- user user /tmp/mactests/untar/file02
09 Apr 11 13:50:09 4130 .ac -rwxr--r-- user user /tmp/mactests/untar/file01
0 .ac -rw-r--r-- user user /tmp/mactests/untar/file03
2598 .ac -rwxr--r-- user user /tmp/mactests/untar/file02
-> Result 7: Uncompressing files,access and change times are modified when uncompressed, however modification times remain untouched (this is one of the reasons why you can find files with a modification time earlier than their access and change time).
mactime test 8 - what about directories
user@machine:/tmp/mactests$ mactime -y -d /tmp/mactests/ 1/2/1970 | grep -v mactime
09 Apr 10 16:19:55 0 mac -rw-r--r-- user user /tmp/mactests/file03
09 Apr 10 17:52:57 4130 m.c -rwxr--r-- user user /tmp/mactests/file01
09 Apr 10 17:53:07 2598 m.c -rwxr--r-- user user /tmp/mactests/file02
09 Apr 10 17:53:17 10240 m.c -rw-r--r-- user user /tmp/mactests/file.tar
4130 .a. -rwxr--r-- user user /tmp/mactests/file01
2598 .a. -rwxr--r-- user user /tmp/mactests/file02
09 Apr 11 13:50:09 10240 .a. -rw-r--r-- user user /tmp/mactests/file.tar
09 Apr 11 13:50:23 4096 mac drwxr-xr-x user user /tmp/mactests/untar
user@machine:/tmp/mactests$ cd untar/
user@machine:/tmp/mactests/untar$ touch newfile04
user@machine:/tmp/mactests/untar$ cd ..
user@machine:/tmp/mactests$ mactime -y -d /tmp/mactests/ 1/2/1970 | grep -v mactime
09 Apr 10 16:19:55 0 mac -rw-r--r-- user user /tmp/mactests/file03
09 Apr 10 17:52:57 4130 m.c -rwxr--r-- user user /tmp/mactests/file01
09 Apr 10 17:53:07 2598 m.c -rwxr--r-- user user /tmp/mactests/file02
09 Apr 10 17:53:17 10240 m.c -rw-r--r-- user user /tmp/mactests/file.tar
4130 .a. -rwxr--r-- user user /tmp/mactests/file01
2598 .a. -rwxr--r-- user user /tmp/mactests/file02
09 Apr 11 13:50:09 10240 .a. -rw-r--r-- user user /tmp/mactests/file.tar
09 Apr 11 13:50:23 4096 .a. drwxr-xr-x user user /tmp/mactests/untar
09 Apr 11 13:55:46 4096 m.c drwxr-xr-x user user /tmp/mactests/untar
-> Result 8: When a directory is created, its mac times change. When a new file is added to a directory, the directory modification and access times also change.
Remember in any forensic investigation that mac times ONLY keep the latest time the file was modified, accessed or (metadata) changed.
As a final point, files in ext3 file system change m and c times when they are deleted. NTFS, however, does not.

This post is only the gate to understand mac times and the information they provide. You can find more information on this topic on the SANS forensics site
Keeping your command lines on Linux
This post is just a handy proposal when doing pen-testing from a Linux box. Keep all the commands you launched from your command line. By default, normally the first 500 ones are saved in the history file of your user profile, in a file named .bash_history.
It is a good idea to increase the number of commands that will be saved in that file between sessions and per session. How to do it?
First, check your current values
youruser@yourmachine:~$ echo $HISTFILESIZE
500
youruser@yourmachine:~$ echo $HISTSIZE
500
Second, modify them so that you can keep a reasonably high amount of command lines in the .bash_history file between sessions (HISTFILESIZE) and during sessions (HISTFILESIZE):
youruser@yourmachine:~$ vim .profile
...add these lines in the .profile file
# extended number of command lines per session
export HISTSIZE=50000
# extended number of command lines in the history file
export HISTFILESIZE=250000
Third, re-load your profile
youruser@yourmachine:~$ source ./.profile
Fourth, check new values
youruser@yourmachine:~$ echo $HISTFILESIZE
250000
youruser@yourmachine:~$ echo $HISTSIZE
50000
Fifth, do the same steps with the root user (if you use it for pen-testing)
And finally, copy the history file regularly so that your commands are stored in two different locations:
youruser@yourmachine:~$ cp ./.bash_history commandhistory032009.txt
Backtrack, netbooks and virtualisation
Labels:
Backtrack 3,
drivers,
security tests,
ubuntu 8.10,
virtualbox,
virtualisation

The need to install and work with new Linux distributions, some of them security related such us Backtrack 3, is always permanent. By the way, here you can find the link to the Linux distributions list.
Most of the current security tools run on those platforms. If we add as hardware element to this scenario one of the lightweight and attractive netbooks, then the combination can result into a frustrating experience trying to get network, especially wireless, video and sound to work.
This entry proposes a way forward for the scenario mentioned. The target will be to install a security testing platform (e.g. Backtrack 3) in a netbook without having to install new drivers on the machine (see screenshot above). The key steps are:
- Install in your netbook the operating system you prefer. If possible, let it coincide with the easiest OS. For example, the installation of Ubuntu intrepid (8.10) in most of the netbooks is relatively easy following the tips presented in the Ubuntu wiki. Do not trust all sites proposing ways forward to solve the problems you face with the installation (some of the pages that the typical search engines can provide with keywords such as "install wireless Ubuntu netbook name" will confuse you rather than help you).
- Once you get your video drivers and network to work, you have already a working platform - let's get the most of that. Probably you will need to install additional drivers in Ubuntu. A note on this, keep the driver files (and the instructions how to do it) at hand. You will need to install them again after a kernel update if they are not part of the regular distribution.
- Install virtualbox, a virtualisation platform available from Sun, ready to use and able to produce snapshots.
- Within virtualbox, create a virtual machine out of the Backtrack 3 iso file. You can even create a bootable virtual harddisk based on BT3 following this website (the last fragment related to VMware, where there is also a link to the automated script present in BT3 beta, and absent in BT3 final, that will help you) and this one (also at the end of the page).
- There is no need to go through the hassle of installing new drivers. If you got your wireless network running in your host system, then the guest system will use it directly ;-)
This way, you will get something like the screenshot below i.e. Backtrack 3 with a working wireless connection running on a virtual machine on top of Ubuntu Intrepid.
Last handy tip: Follow the menues shown in this screenshot and place the KDE panel on top of the screen and not below (as it appears by default)- otherwise you will not see it in the small screen of the netbook - unless you install virtuabox guest additions!)
 Happy virtual work!
Subscribe to:
Posts (Atom)


